

Free Azure DevOps CICD with Smarterasp.net hosting, Part 2
Description
On my previous post I started to explain how to create a full CI/CD DevOps automated deployment cycle for your Smarterasp.net hosting websites defining the build pipeline implementation.
After creating a Build pipeline, we are going to finish it creating a release pipeline.
Requirements
You will need to fulfil some requirements first:
- Previous post regarding build pipeline already done.
- An SmarterAsp web hosting.
Steps to create a release pipeline
Check if the .NET version of your website is supported in smarterasp https://www.smarterasp.net/support/kb/a1986/supported-versions-of-_net-core.aspx
End of support versions normally are disabled, check here which version is already deprecated:
https://dotnet.microsoft.com/platform/support/policy/dotnet-core
Login to your smarterAsp.net hosting account control panel, go to [websites] tab. If there is no website already created, create one clicking [+New website] button and follow the steps, it is pretty straightforward.
After that you can expand your website settings clicking on [***] button on the right, you will have to check two main settings: Asp .NET Version and VS Webdeploy:
Check that your website has assigned the right pool type (ASP.NET 4.x Integrated):
Check that your VS Webdeploy feature is enabled and copy: Service URL, Site/Application and Username in a temporary place like your notepad, you will use them later (password is the same you use to enter Smarterasp.net control panel):
In Azure Devops check that your build pipeline generates the scripts to deploy your website using Web Deploy. Go to [Pipelines]-> Click on your [build pipeline name]-> Click on the [latest build]-> you will see a table where there is a row named [Related: 1 published(...)], click on 1 published:
You should be able to see a folder with a [xxx.cmd] file, some [xxx.xml] files and a [xxx.zip] file similar to this screenshot:
After confirming that, you ensured you have the necessary files from your build pipeline, now let's start in Azure DevOps with the release pipeline work, open [Releases] tab in [Pipelines] section and click new release:
Select [Empty job] template:
If you don't plan to create a multi environment pipeline like [Development -> Staging -> Production]... just leave it with one basic environment: [Stage 1] and close this form:
Add the artifact generated by your build pipeline, click [+Add]:
Select the source (build pipeline) from this drop down and click [Add]:
Set [continuous deployment trigger] to [Enabled] so every time a build is finished will trigger an automatic deployment:
From the notepad details you saved before, create a new release variable for your password, click on [variables] and add: smarteraspPassword variable name, value, scope and save:
Now, let's add some deployment tasks to [Stage 1] environment, click on [1 job, 0 tasks]:
Firs add two [RegEx Find & Replace task], in the search box type: replace, a specific task box will be shown, Add it two times:
Add a PowerShell task too:
You should have 3 tasks added, let's configure the first one.
1) Add a meaningful name in Display name.
2) In Search Paths to Input Files field add: **\yoursite.deploy.cmd
where you have to replace the bold part with the real name of the cmd file generated
by your build release as you have seen before in the screenshot above.
3) In Find RegEx field add: _ArgComputerNameWithQuote\="%_ArgValue%"&goto
4) In Replace With field add: _ArgComputerNameWithQuote="https://yoursite:8172/
msdeploy.axd?site=yoursite-001-site4"&goto
where you have to replace the bold part with the real Service URL value you copied in
notepad from SmarterAsp.net Web Deploy details before.
NOTE: SmarterAsp.net creates a self-signed certificate for the WebDeploy port 8172.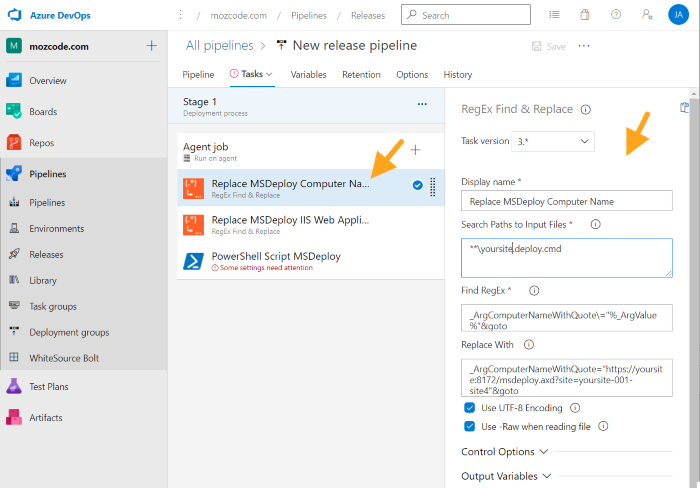
Let's configure the second Replace task.
1) Add a meaningful name in Display name.
2) In Search Paths to Input Files field add: **\yoursite.SetParameters.xml
where you have to replace the bold part with the real name of the xml file in your build as
you've seen before in the screenshot above.
3) In Find RegEx field add: \<setParameter name\="IIS Web Application Name"
value\="Default Web Site" \/\>
4) In Replace With field add: <setParameter name="IIS Web Application Name"
value="yoursiteapp" />
where you have to replace the bold part with the real Site/Application value you copied in
notepad from SmarterAsp.net Web Deploy details before.
Let's configure the last step, the powershell script to deploy your website.
1) Add a meaningful name in Display name.
2) In Script field add: your-file-path/yoursite.deploy.cmd /Y /M:hardcoded /U:your-user-001 /P:$(smarteraspPassword) /G:False /A:Basic -allowUntrusted -enableRule:AppOffline
where you have to replace your-file-path with the real path of the xml file in your build as
you've seen before in the screenshot above. (In my case was:
_mozcode.com-ASP.NET-CI/drop/Miniblog.Core.deploy.cmd)
Replace your-user-001 with the real username as you've seen before in the
screenshot.
(Note: you are using the release password variable you declared before and getting it value
in this way: $(smarteraspPassword) ).
3) Click [Save]and then click [Create Release]
You should be able to see a successful web deploy release in your pipeline log:
If you see Error 500.34 in your browser after deploying your website and checking how it looks it happens because SmarterAsp.net is sharing your web application pool with another existing website and it won't work in this way. More info in these links:
https://www.smarterasp.net/support/kb/a1999/what-should-we-do-when-get-http-error-500_34-ancm-mixed-hosting-models-not-supported.aspx
https://weblog.west-wind.com/posts/2020/Jan/14/ASPNET-Core-IIS-InProcess-Hosting-Issues-in-NET-Core-31
To fix it, you have to add this line (AspNetCoreHostingModel one) in your .csproj file in all your smarterAsp.net websites deployed to that shared application pool and deploy them again:
And that's all folks!
Comments
Comments are closed